
Introduction:
Have you ever looked at a glass of water and wondered what secrets it hides? What if you could split it apart into the very gases that fuel rockets and sustain life, using nothing more than a battery, two wires, and a bit of curiosity?
Welcome to your complete guide to the electrolysis of water experiment. This is not just a quick demonstration. It is a hands-on journey into one of the most important processes in electrochemistry. Whether you are a student preparing a formal lab report, a teacher searching for a classroom-friendly experiment, or simply a science enthusiast eager to see chemistry come alive, this walkthrough will help you.
In this lab we will break water (H₂O) into its fundamental components, hydrogen and oxygen gas, right before your eyes. You will learn the aim, theory, materials, procedure, observations, and analysis needed to confidently conduct and write about this experiment like a true scientist.
So put on your lab goggles and get ready. By the end of this guide you will not only have produced hydrogen and oxygen yourself, but also understand the science behind every bubble that forms. Let us begin.
Theory & Background – Electrolysis of Water
Electrolysis is the process of using a direct electrical current (DC) to initiate a non-spontaneous chemical reaction. In the case of water, this involves the decomposition of water molecules into hydrogen and oxygen gases.
Overall Chemical Reaction
The balanced chemical equation for the electrolysis of water is:
2H₂O (l) → 2H₂ (g) + O₂ (g)
This equation indicates that two molecules of liquid water decompose to yield two molecules of hydrogen gas and one molecule of oxygen gas.
Role of the Electrolyte
Pure water is a poor conductor of electricity due to the absence of sufficient free ions. For effective electrolysis, an electrolyte must be added to increase the conductivity of the solution. Common electrolytes include sodium bicarbonate (NaHCO₃) and sodium chloride (NaCl).
It should be noted that while both substances can function as electrolytes, sodium bicarbonate is preferred in laboratory and home experiments because it does not produce harmful byproducts. The use of sodium chloride can lead to the release of chlorine gas (Cl₂) at the anode, which is hazardous.
Electrode Reactions
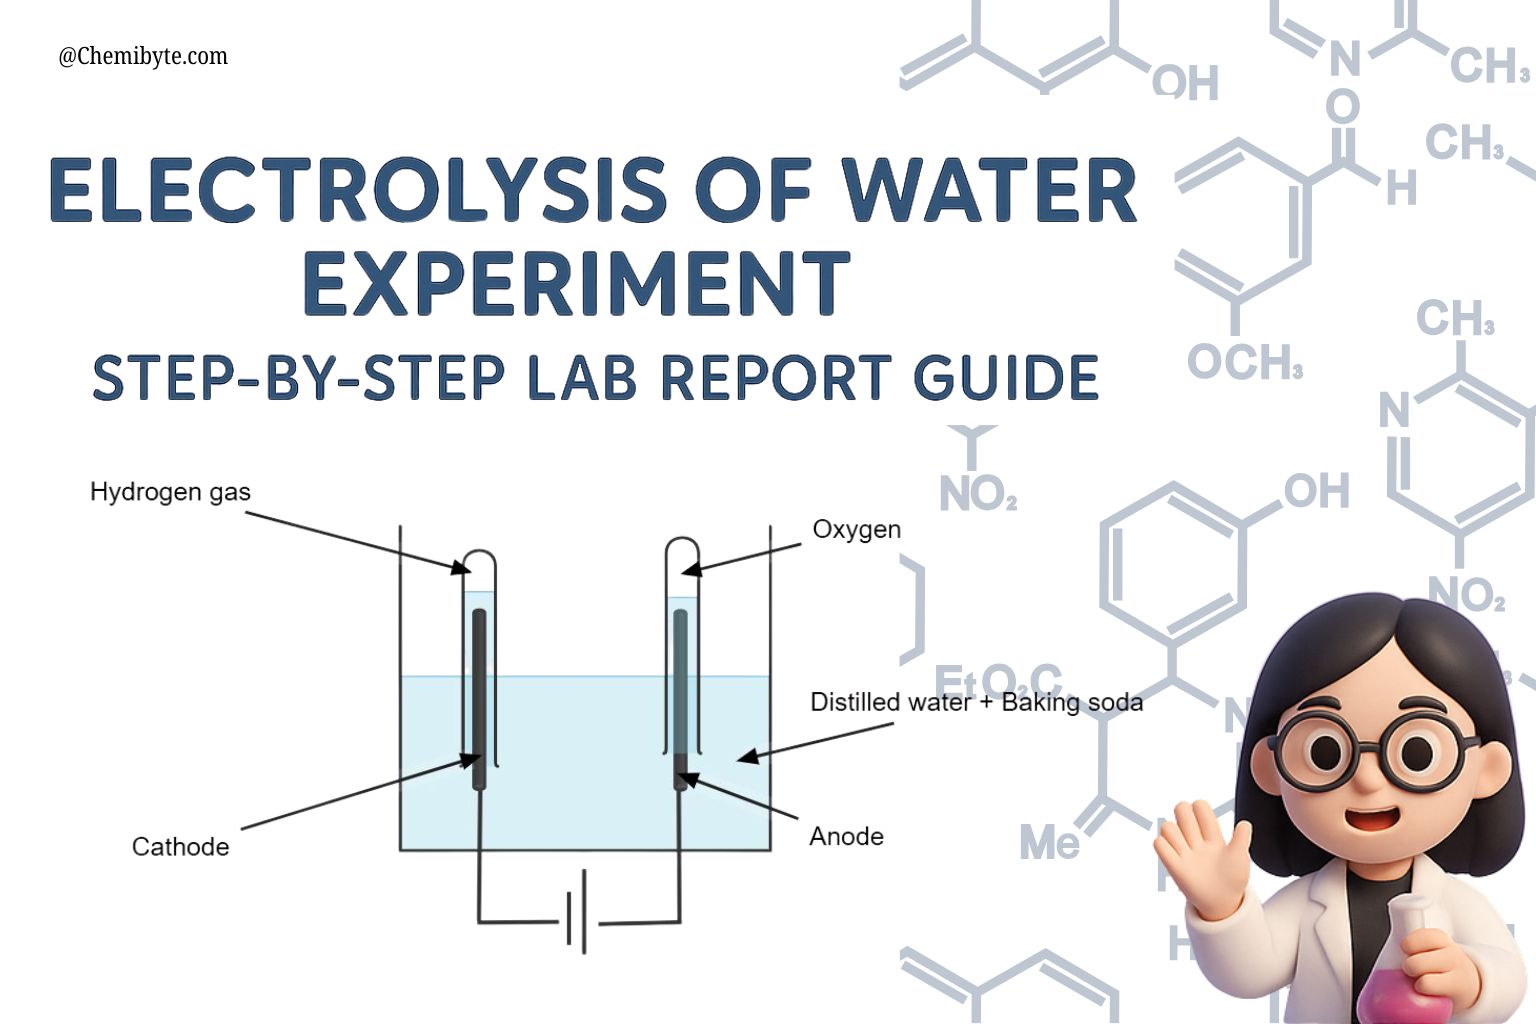
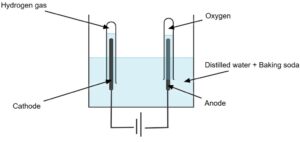
Electrolysis occurs at two electrodes immersed in the electrolyte solution:
-
Cathode (negative electrode): Hydrogen ions (H⁺) gain electrons (reduction) to form hydrogen gas (H₂).
-
Anode (positive electrode): Water molecules are oxidized, releasing oxygen gas (O₂) along with hydrogen ions (H⁺).
Thus, the energy supplied by the electrical current provides the activation energy required to break the covalent bonds within water molecules, producing gaseous hydrogen and oxygen in a stoichiometric ratio of 2:1.
That looks excellent — very clear and thorough. Yes, the next natural step in a lab-style blog is the Materials & Apparatus section so your readers know exactly what they need before starting. Here’s a polished draft for you:
Materials & Apparatus –Electrolysis of water
To perform the electrolysis of water safely and effectively, you will need a few simple materials and pieces of equipment. Most of these are easy to find in a classroom or even at home with some basic substitutions.
Glassware and Solution
- A beaker or glass container (around 250–500 mL capacity)
- Distilled water (tap water can be used, but distilled gives clearer results)
- Electrolyte: a small amount of baking soda (NaHCO₃) dissolved in the water
Electrodes and Power Source
- Two graphite rods (or pencils with exposed graphite tips)
- A DC power source such as a 6–9V battery or a small DC adapter
- Connecting wires with alligator clips to attach electrodes to the battery
Gas Collection Setup
- Two small test tubes or inverted containers to collect hydrogen and oxygen
- A stand or clamps to hold the test tubes in place over the electrodes
Safety Equipment
- Safety goggles
- Gloves (optional but recommended)
- A well-ventilated workspace
Substitutions for Home Experiments
- Instead of graphite rods, ordinary pencils with sharpened ends exposing the graphite core can be used.
- If test tubes are unavailable, any small transparent container that can be inverted and filled with water will work for gas collection.
Procedure
-
A 250 mL beaker was filled with approximately 200 mL of distilled water.
-
A small quantity of sodium bicarbonate (NaHCO₃) was added to the water and stirred until dissolved to act as the electrolyte.
-
Two graphite electrodes were prepared and connected to a 6–9 V DC power source using insulated connecting wires with alligator clips.
-
The electrodes were then immersed in the electrolyte solution, ensuring they did not touch each other.
-
Two test tubes were filled with water, inverted, and positioned over each electrode to collect the gases released during electrolysis. The test tubes were supported with a clamp stand.
-
The power source was switched on, and the electrodes were observed for the formation of gas bubbles.
-
The gases were allowed to collect in the test tubes for several minutes.
-
After sufficient gas was collected, the power source was switched off.
-
The collected gases were tested as follows:
-
The gas from the cathode was tested with a burning splint, producing a characteristic “pop” sound, confirming hydrogen.
-
The gas from the anode was tested with a glowing splint, which relit, confirming oxygen.
-
Observations & Results
-
Upon switching on the power supply, gas bubbles were observed forming at both electrodes.
-
The volume of gas collected at the cathode was approximately twice the volume of gas collected at the anode.
-
The gas collected at the cathode was colorless and produced a characteristic “pop” sound when tested with a burning splint, confirming it as hydrogen.
-
The gas collected at the anode was also colorless and caused a glowing splint to relight, confirming it as oxygen.
-
The ratio of hydrogen to oxygen produced was observed to be close to 2:1, consistent with the stoichiometric prediction of the reaction.
Discussion
The experiment successfully demonstrated the (Electrolysis of water) decomposition of water into hydrogen and oxygen gases through the process of electrolysis. The appearance of gas bubbles at both electrodes confirmed that electrochemical reactions were occurring.
At the cathode, hydrogen gas was produced as expected due to the reduction of hydrogen ions. At the anode, oxygen gas was released as a result of the oxidation of water molecules. The identification of the gases using the glowing and burning splint tests provided strong evidence supporting the theoretical predictions.
The observed ratio of hydrogen to oxygen was approximately 2:1, which is consistent with the balanced chemical equation:
2H₂O (l) → 2H₂ (g) + O₂ (g)
Minor deviations from the exact ratio may have resulted from experimental limitations such as gas leakage, incomplete collection, or measurement errors. Additionally, the use of sodium bicarbonate as the electrolyte provided a safe and effective medium, as it enhanced conductivity without introducing hazardous byproducts such as chlorine gas, which could have been formed if sodium chloride was used instead.
Overall, the experiment confirmed the theoretical principles of electrolysis and highlighted the importance of electrolytes in facilitating ionic conduction.
Post-Lab Questions – Electrolysis of water
-
Why were graphite electrodes used instead of metals such as copper or zinc?
-
Why was sodium bicarbonate (NaHCO₃) chosen as the electrolyte instead of using only water? Could another substance be used safely?
-
Why is pure water a poor conductor, and how does adding an electrolyte solve this problem?
-
How do we know the gas released at the cathode is hydrogen and not another gas?
-
How do we confirm that the gas released at the anode is oxygen?
-
How can you experimentally verify that the ratio of hydrogen to oxygen is 2:1?
-
What sources of error might cause deviations from the expected gas ratio?
-
If sodium chloride were used instead of sodium bicarbonate, what gas would be formed at the anode, and why would this be unsafe?
Post-Lab Questions and Answers – Electrolysis of water
Why were graphite electrodes used instead of metals such as copper or zinc?
Graphite electrodes were used because graphite is both a good conductor of electricity and chemically inert under the conditions of the experiment. If reactive metals such as copper or zinc were used, they could dissolve into the solution or take part in unwanted side reactions, which would interfere with the electrolysis of water and alter the products. Using graphite ensures that only the intended decomposition of water occurs.
Why was sodium bicarbonate (NaHCO₃) chosen as the electrolyte in electrolysis in water experiment, and why not pure water?
Sodium bicarbonate was selected because it dissociates in water to provide free ions (Na⁺ and HCO₃⁻), which allow the solution to conduct electricity. Pure water contains very few ions and is therefore a poor conductor, meaning electrolysis would occur extremely slowly or not at all. By adding sodium bicarbonate, the conductivity of the solution increases, enabling efficient electrolysis while still remaining safe and non-toxic.
How do we know the gas released at the cathode is hydrogen and not another gas?
The gas collected at the cathode was tested with a burning splint. It produced a characteristic “pop” sound, which is the standard confirmatory test for hydrogen gas. No other common gas produced in this setup gives this reaction, so the result confirms that the cathodic gas is hydrogen.
How do we confirm that the gas released at the anode is oxygen?
The gas collected at the anode was tested using a glowing splint. When the glowing splint was introduced into the test tube, it reignited, which is the standard laboratory test for oxygen gas. This observation confirmed that the gas produced at the anode was oxygen.
How can you experimentally verify that the ratio of hydrogen to oxygen is 2:1?
The gases can be collected in separate, inverted test tubes placed over each electrode. By measuring the relative volumes of gas produced, it can be observed that the volume of hydrogen collected at the cathode is approximately twice the volume of oxygen collected at the anode. This verifies the stoichiometric prediction of the balanced chemical equation for water electrolysis, which states that two molecules of hydrogen are produced for every one molecule of oxygen.
What sources of error might cause deviations from the expected gas ratio?
Several factors could affect the accuracy of the observed hydrogen-to-oxygen ratio. Gas may escape during collection if the test tubes are not properly sealed. Small leaks in the connections or misalignment of the electrodes can also reduce the measured volumes. Incomplete displacement of water inside the test tubes may lead to incorrect readings. Additionally, side reactions at the electrodes, contamination of the electrolyte, or uneven electrode surfaces can influence gas production. These errors may cause the observed ratio to deviate from the theoretical 2:1 value.
In electrolysis of water experiment If sodium chloride were used instead of sodium bicarbonate, what gas would be formed at the anode, and why would this be unsafe?
If sodium chloride (NaCl) were used as the electrolyte, chloride ions (Cl⁻) could be oxidized at the anode to form chlorine gas (Cl₂) instead of oxygen. Chlorine gas is toxic, corrosive, and hazardous to inhale, making it unsuitable for safe laboratory or classroom demonstrations. This is why sodium bicarbonate is the preferred electrolyte for this experiment, as it enhances conductivity without producing harmful byproducts.
Read more blogs
Alkali Metals Explained: Properties, Reactions, and Real-Life Uses
Can We Actually See Atoms Today? Real Pictures of Atoms